
How to Build an MCP Server in TypeScript (Step by Step)

AI coding assistants can read your code and run commands, but they don't know about your internal API, your database or the services your team uses. An MCP server is how you give them that access. In this post I will show you how to build an MCP server in TypeScript, step by step, with the official SDK. The short version: install @modelcontextprotocol/server and zod, create an McpServer, register a tool with registerTool(), serve it with serveStdio(), test it in the MCP Inspector and add it to Claude Code, VS Code or Cursor with a single command or JSON entry.
Everything here was tested with Node.js 24.21, TypeScript 7.0.2 and version 2.3.1 of the official MCP TypeScript SDK, on Windows 11, in October 2026.
What is an MCP server?
MCP (Model Context Protocol) is an open standard for connecting AI applications to external systems. The official docs compare it to a USB-C port: one standard plug, so any AI app can talk to any tool that implements it. Anthropic created it, and in December 2025 donated it to the Agentic AI Foundation, under the Linux Foundation.
There are three roles:
- Host: the AI application the user talks to (Claude Code, VS Code with Copilot, Cursor, ChatGPT...).
- Client: the piece inside the host that connects to one MCP server.
- Server: the program you write. It exposes capabilities the model can use.
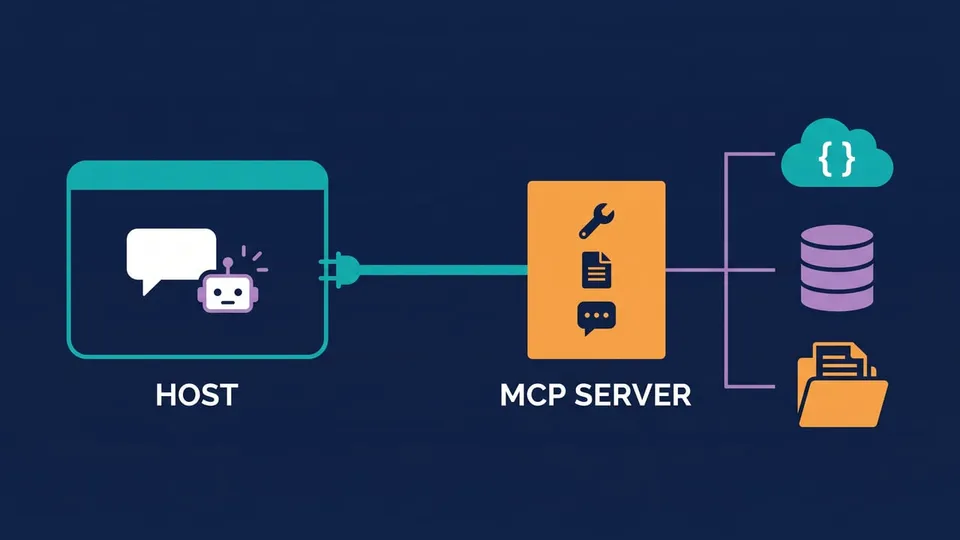
An MCP server can expose three kinds of things:
| Primitive | What it is | Who decides to use it | Example |
|---|---|---|---|
| Tools | Functions the model can call | The model | Look up an npm package |
| Resources | Read-only data the app can attach as context | The application | The project's package.json |
| Prompts | Reusable message templates | The user (slash command, menu) | "Check my dependencies" |
Under the hood, client and server exchange JSON-RPC messages over a transport: stdio when the host starts your server as a local process, or Streamable HTTP when the server runs as a web endpoint.
MCP SDK v1 vs v2: which package to use
Note: Many MCP server tutorials still use the @modelcontextprotocol/sdk package, with server.tool() and imports like @modelcontextprotocol/sdk/server/mcp.js. That's version 1 of the SDK. Version 2 is now the stable release line. It implements the 2026-07-28 MCP specification and splits the SDK into separate packages: @modelcontextprotocol/server and @modelcontextprotocol/client. Version 1 still gets bug and security fixes, but new projects should start on v2, and that's what we'll use here.
How to build an MCP server: the example project
As an example, let's build a small server for web developers called npm-helper, with one of each primitive:
- a tool,
get-package-info, that returns the latest version, description and weekly downloads of an npm package; - a resource,
project://package.json, with thepackage.jsonof the project the server runs in; - a prompt,
check-dependencies, that asks the model to compare the project's dependencies with the latest versions on npm.
It uses the public npm registry API, so you don't need an API key.
Step 1: Create the project
You need Node.js 20 or later. Create a folder and a package.json:
mkdir npm-helper && cd npm-helper
npm init -y
npm pkg set type=module
npm pkg set type=module makes the project use ES modules, which is what the SDK examples use.
Now install the SDK and Zod, which we'll use to describe the tool inputs:
npm install @modelcontextprotocol/server zod
And the development dependencies: TypeScript, the Node.js types and tsx, which runs TypeScript files directly, without a build step:
npm install -D typescript @types/node tsx
Step 2: Create the server and register a tool
Create a src/server.ts file. It exports a createServer function that builds the server and registers its capabilities:
import { readFile } from 'node:fs/promises'
import { McpServer } from '@modelcontextprotocol/server'
import * as z from 'zod/v4'

export function createServer(): McpServer {
  const server = new McpServer({ name: 'npm-helper', version: '1.0.0' })

  server.registerTool(
    'get-package-info',
    {
      description:
        'Get the latest version, description and weekly downloads of an npm package',
      inputSchema: z.object({
        name: z.string().describe('Package name, e.g. react or @types/node'),
      }),
    },
    async ({ name }) => {
      const res = await fetch(`https://registry.npmjs.org/${name}/latest`)
      if (!res.ok) {
        return {
          content: [{ type: 'text', text: `Package ${name} not found (HTTP ${res.status})` }],
          isError: true,
        }
      }
      const pkg = (await res.json()) as { version: string; description?: string }

      const dl = await fetch(`https://api.npmjs.org/downloads/point/last-week/${name}`)
      const { downloads } = dl.ok ? ((await dl.json()) as { downloads: number }) : { downloads: 0 }

      const text = [
        `${name}@${pkg.version}`,
        pkg.description ?? 'No description',
        `Weekly downloads: ${downloads.toLocaleString('en-US')}`,
      ].join('\n')

      return { content: [{ type: 'text', text }] }
    }
  )

  return server
}
Let's see what's going on here:
new McpServer()takes the name and version the server reports to clients.registerTool()takes the tool name, a config and an async handler.- The
descriptionis what the model reads to decide when to call the tool, so write it for the model: say what the tool does and what it returns. inputSchemais a Zod schema. From it, the SDK generates the JSON Schema the model sees, validates the arguments before your handler runs and infers the handler's types (nameis astringhere, no extra typing needed). The text in.describe()goes into the JSON Schema as the description of the argument.- The handler returns
content, a list of blocks. Here it's a singletextblock. - When something goes wrong, return
isError: truewith a message. The model reads the message and can react to it, for example by trying another name or telling the user what happened.
We'll use readFile in step 5.
Step 3: Run it over stdio
Now create src/index.ts, the entry point that the host will run:
import { serveStdio } from '@modelcontextprotocol/server/stdio'
import { createServer } from './server.js'

void serveStdio(createServer)
console.error('npm-helper MCP server running on stdio')
serveStdio() reads requests from stdin, writes responses to stdout and calls createServer to build the server instance.
Note the ./server.js extension in the import, even though the file is server.ts. That's how TypeScript resolves imports in ES modules.
Run it:
npx tsx src/index.ts
You'll see only this line, and the process keeps waiting:
npm-helper MCP server running on stdio
That's expected: a stdio server waits for a client to send it messages. Stop it with Ctrl + C.
Important! In a stdio server, stdout is the protocol channel. Never use console.log(): any text you print there gets mixed with the JSON-RPC messages and breaks the connection. Log with console.error(), which goes to stderr.
Step 4: Test your MCP server with the MCP Inspector
The MCP Inspector is the official tool to test MCP servers without an AI client. You pass it the command that starts your server:
npx @modelcontextprotocol/inspector npx tsx src/index.ts
It starts your server and opens a web UI at http://127.0.0.1:6274 (the URL in the terminal includes an access token). Click Connect, open the Tools tab, select get-package-info, type a package name like zod and run it.
The Inspector also has a CLI mode, which is handy for quick checks and scripts:
npx @modelcontextprotocol/inspector --cli npx tsx src/index.ts --method tools/call --tool-name get-package-info --tool-arg name=zod
This is what I got:
{
  "content": [
    {
      "type": "text",
      "text": "[email protected]\nTypeScript-first schema declaration and validation library with static type inference\nWeekly downloads: 346,947,379"
    }
  ]
}
With --method tools/list you see the tool as the model sees it, with the JSON Schema generated from Zod:
{
  "tools": [
    {
      "name": "get-package-info",
      "description": "Get the latest version, description and weekly downloads of an npm package",
      "inputSchema": {
        "type": "object",
        "properties": {
          "name": {
            "type": "string",
            "description": "Package name, e.g. react or @types/node"
          }
        },
        "required": ["name"],
        "$schema": "https://json-schema.org/draft/2020-12/schema"
      }
    }
  ]
}
Let's test the validation too. Calling the tool without the name argument, the SDK rejects the call before the handler runs:
Input validation error: Invalid arguments for tool get-package-info: name: Invalid input: expected string, received undefined
Step 5: Add a resource
Tools are for actions. For data the application can read and attach as context, MCP has resources. Add this inside createServer(), before return server:
server.registerResource(
  'package-json',
  'project://package.json',
  {
    title: 'Project package.json',
    description: 'The package.json of the project the server runs in',
    mimeType: 'application/json',
  },
  async (uri) => ({
    contents: [
      { uri: uri.href, mimeType: 'application/json', text: await readFile('package.json', 'utf8') },
    ],
  })
)
registerResource() takes a name, a URI, metadata and a callback that returns the contents. The URI scheme (project://) is up to you.
The path package.json is relative, so it's resolved from the folder where the server process starts. When a host starts the server from your project folder, the resource returns that project's package.json.
Tip: For data with a variable part, like users://{userId}/profile, the SDK has ResourceTemplate. The SDK docs show how to use it.
Step 6: Add a prompt
Prompts are message templates that the user picks, usually as a slash command in the host. Add this one, also before return server:
server.registerPrompt(
  'check-dependencies',
  {
    title: 'Check dependencies',
    description: 'Compare the project dependencies with the latest versions on npm',
  },
  () => ({
    messages: [
      {
        role: 'user',
        content: {
          type: 'text',
          text: 'Read the project://package.json resource. For each dependency, call get-package-info and list the ones that are behind the latest version.',
        },
      },
    ],
  })
)
This prompt ties the other two together: it tells the model to read the resource and then call the tool for each dependency. If your prompt needs arguments, add an argsSchema with a Zod object, just like inputSchema in tools.
Run the Inspector again and check the Resources and Prompts tabs. Or from the CLI:
npx @modelcontextprotocol/inspector --cli npx tsx src/index.ts --method resources/read --uri project://package.json
npx @modelcontextprotocol/inspector --cli npx tsx src/index.ts --method prompts/get --prompt-name check-dependencies
How to add your MCP server to Claude Code, VS Code and Cursor
Every host does the same thing with a local server: it runs a command and talks to the process over stdin and stdout. For us the command is npx tsx src/index.ts. What changes is where you put it.
Claude Code
From the project folder, run:
claude mcp add npm-helper -- npx tsx src/index.ts
Everything after -- is the command that starts the server. Then check the status with claude mcp list:
npm-helper: npx tsx src/index.ts - ✔ Connected
Inside a Claude Code session, the /mcp command shows the server and its tools. By default the server is saved only for you, in this project (local scope). Use --scope project to save it in a .mcp.json file you can commit and share with your team, or --scope user to have it in all your projects (in that case, use the absolute path to the server file). If you're still choosing an AI coding tool, I compared Cursor vs Claude Code and Codex vs Claude Code in other posts.
VS Code
Create a .vscode/mcp.json file in the project:
{
  "servers": {
    "npm-helper": {
      "type": "stdio",
      "command": "npx",
      "args": ["tsx", "src/index.ts"]
    }
  }
}
VS Code asks you to trust the server the first time it starts it. The MCP: List Servers command shows the status, and the tools are available in Copilot Chat in Agent mode.
Cursor
Create a .cursor/mcp.json file in the project (or ~/.cursor/mcp.json to use it in every project):
{
  "mcpServers": {
    "npm-helper": {
      "command": "npx",
      "args": ["tsx", "src/index.ts"]
    }
  }
}
Now try asking the agent something like "what's the latest version of react and how many weekly downloads does it have?". You don't need to mention the tool: the model picks get-package-info from its name, description and input schema. VS Code, for example, asks you to approve the call before it runs.
Build for production
tsx is great while you develop. To ship the server, compile it to JavaScript with tsc. Create a tsconfig.json:
{
  "compilerOptions": {
    "target": "es2022",
    "module": "nodenext",
    "strict": true,
    "outDir": "dist",
    "rootDir": "src",
    "types": ["node"],
    "skipLibCheck": true
  },
  "include": ["src"]
}
Add these scripts to package.json:
"scripts": {
  "dev": "tsx src/index.ts",
  "build": "tsc",
  "start": "node dist/index.js"
}
Run npm run build, and the host command becomes node dist/index.js (with the absolute path, if the host starts it from another folder). If you want to know more about how TypeScript fits in a Node.js project, I wrote about it in Node.js with TypeScript.
Serve your MCP server over HTTP (Streamable HTTP)
stdio is the right choice when the server runs on the same machine as the host. When you want one server that many clients reach over the network (a remote MCP server), use the Streamable HTTP transport.
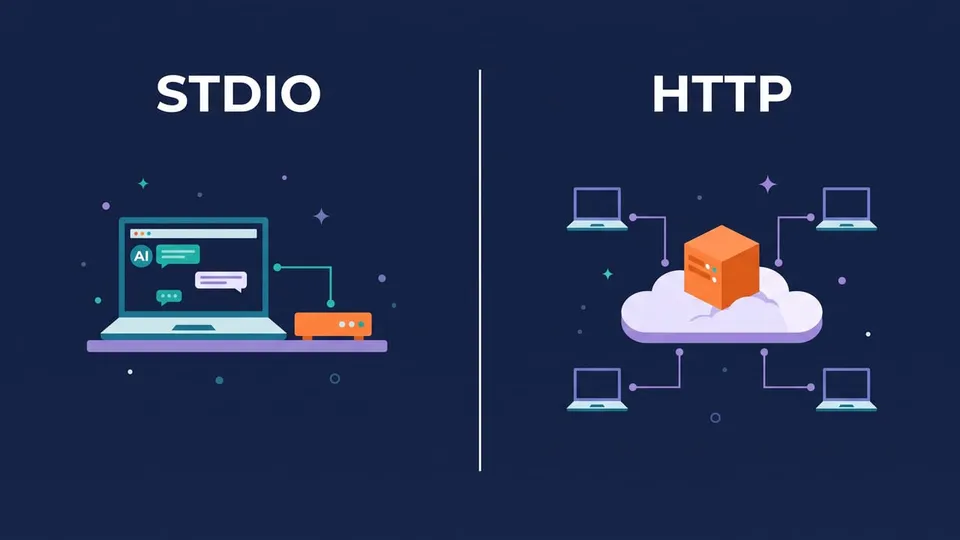
Since createServer is a separate function, we can reuse it. Install the Node.js adapter:
npm install @modelcontextprotocol/node
And create src/http.ts:
import { createServer as createHttpServer } from 'node:http'
import { createMcpHandler } from '@modelcontextprotocol/server'
import {
  localhostHostValidation,
  localhostOriginValidation,
  toNodeHandler,
} from '@modelcontextprotocol/node'
import { createServer } from './server.js'

const handler = createMcpHandler(createServer)
const nodeHandler = toNodeHandler(handler)
const validateHost = localhostHostValidation()
const validateOrigin = localhostOriginValidation()

createHttpServer((req, res) => {
  if (!validateHost(req, res) || !validateOrigin(req, res)) return
  void nodeHandler(req, res)
}).listen(3000, '127.0.0.1', () => {
  console.log('npm-helper MCP server on http://127.0.0.1:3000/mcp')
})
Here console.log() is fine, because the protocol goes over HTTP, not stdout.
createMcpHandler() calls createServer for each request. Since the 2026-07-28 spec, the protocol is stateless: there's no initialization handshake or session ID anymore, so any instance of your server can answer any request, and it scales horizontally behind a load balancer. The SDK still answers clients that speak the older 2025 versions of the spec, from the same handler.
The two validation functions check the Host and Origin headers and answer 403 to anything that isn't localhost. That protects against DNS rebinding, where a malicious web page tries to reach a server running on your machine.
Run it with npx tsx src/http.ts and test it with the Inspector:
npx @modelcontextprotocol/inspector --cli http://127.0.0.1:3000/mcp --method tools/call --tool-name get-package-info --tool-arg name=react
To add it to Claude Code:
claude mcp add --transport http npm-helper-http http://127.0.0.1:3000/mcp
Important! The handler doesn't check any token. Before you expose an MCP server on the internet, put authentication in front of it. The SDK docs have a guide on authorization with bearer tokens.
Common problems
- The host doesn't see the server or drops the connection. Run the command by hand (
npx tsx src/index.ts). If it crashes, fix the error there. If it prints anything other than the stderr line, look for aconsole.log(). ERR_MODULE_NOT_FOUND: Cannot find package '@modelcontextprotocol/sdk'. You copied v1 code (imports like@modelcontextprotocol/sdk/server/mcp.js) into a v2 project. With v2, import from@modelcontextprotocol/serverand@modelcontextprotocol/server/stdio. To migrate existing code, the SDK has a codemod (@modelcontextprotocol/codemod) and an upgrade guide.- The model never calls the tool. Improve the
description: say what the tool does, when to use it and what it returns. In VS Code, also check that the chat is in Agent mode.
FAQ
What's the difference between MCP and an API?
An API is made for your code: a developer reads the docs and writes the calls. MCP is made for AI applications: the server lists its tools with descriptions and schemas, and the model decides when to call them. The two work together: an MCP server can wrap an existing API, like ours wraps the npm registry.
Do I need Claude to use an MCP server?
No. MCP is an open standard. The same server works in Claude Code, VS Code with Copilot, Cursor, ChatGPT and other hosts that support MCP.
Can I still use @modelcontextprotocol/sdk?
Yes, version 1 still gets bug and security fixes, and old servers keep working. But it implements the older 2025-11-25 spec. For a new MCP server, use the v2 packages.
Should I use stdio or HTTP?
Use stdio for a server that runs on the user's machine, started by the host: it's simpler and needs no port or authentication. Use Streamable HTTP for a remote server shared by many users, and add authentication.
Conclusion
Building an MCP server in TypeScript takes one package, a Zod schema per tool and a few lines to serve it. The parts that need the most care are the tool descriptions, since the model relies on them to decide what to call, and stdout, which belongs to the protocol in a stdio server. Start with stdio and the Inspector, connect the server to your AI tool, and move to HTTP when other people need to use it.
See you next time!
Links
- What is the Model Context Protocol?
- MCP specification
- The 2026-07-28 specification
- MCP TypeScript SDK (GitHub)
- MCP TypeScript SDK v2 docs
- MCP Inspector
- Claude Code: Connect to tools via MCP
- VS Code: MCP servers
- Cursor: Model Context Protocol
Tags: ai|typescript|nodejs