tmux Cheat Sheet: The Commands You Actually Use
A tmux cheat sheet with the commands you actually use: sessions, windows, panes, scrolling, copy mode and a starter tmux.conf, tested on tmux 3.8.

Published 16 min read
tmux is a terminal multiplexer: it runs several shells inside one terminal window, split into windows and panes, and keeps them running after you close the terminal or lose the SSH connection. Most tmux cheat sheets list every key binding there is. This one has the commands you actually use day to day, grouped by task, plus the parts that confuse people: how to scroll up, how copy mode works and what to put in ~/.tmux.conf. The short version: every shortcut starts with the prefix Ctrl+b. Press it, let go, then press the next key. Start a named session with tmux new -s work, detach with Ctrl+b d, list sessions with tmux ls and come back with tmux attach -t work. Split the screen with Ctrl+b % (side by side) and Ctrl+b " (top and bottom), and scroll up with Ctrl+b [.
Note: I tested every command in this post with tmux 3.8 (the current release, from September 2026) and tmux 3.4 (the version in Ubuntu 24.04). When they behave differently, I say so.
The tmux commands you'll use every day
If you only keep one table, keep this one. Ctrl+b d means: press Ctrl+b, release both keys, then press d.
| What you want | Command or keys |
|---|---|
| Start a named session | tmux new -s work |
| List sessions | tmux ls |
| Attach to a session | tmux attach -t work (or tmux a for the last one) |
| Attach, or create it if it doesn't exist | tmux new -A -s work |
| Detach (leave it running) | Ctrl+b d |
| Kill a session | tmux kill-session -t work |
| New window | Ctrl+b c |
| Next / previous window | Ctrl+b n / Ctrl+b p |
| Go to window 0-9 | Ctrl+b 0 ... Ctrl+b 9 |
| Split side by side / top and bottom | Ctrl+b % / Ctrl+b " |
| Move between panes | Ctrl+b + arrow keys |
| Zoom a pane (toggle full screen) | Ctrl+b z |
| Close a pane | Ctrl+b x (or type exit) |
| Scroll up (copy mode) | Ctrl+b [, then q to leave |
| See all key bindings | Ctrl+b ? |
The rest of the post explains each group in more detail.
Install tmux
tmux runs on Linux and macOS:
# macOS (Homebrew)
brew install tmux

# Ubuntu / Debian
sudo apt install tmux

# Fedora
sudo dnf install tmux
Check the version with tmux -V. Distros lag behind the latest release: Ubuntu 24.04 ships tmux 3.4 and Ubuntu 26.04 ships 3.6a, while Homebrew already has 3.8. The commands in this cheat sheet work in all of them.
Windows: tmux doesn't run natively on Windows. Install it inside WSL (wsl --install, then sudo apt install tmux in Ubuntu) and run it from Windows Terminal. If you're not sure which shell to use there, I compared the options in Bash vs Zsh vs PowerShell.
How tmux works: sessions, windows and panes
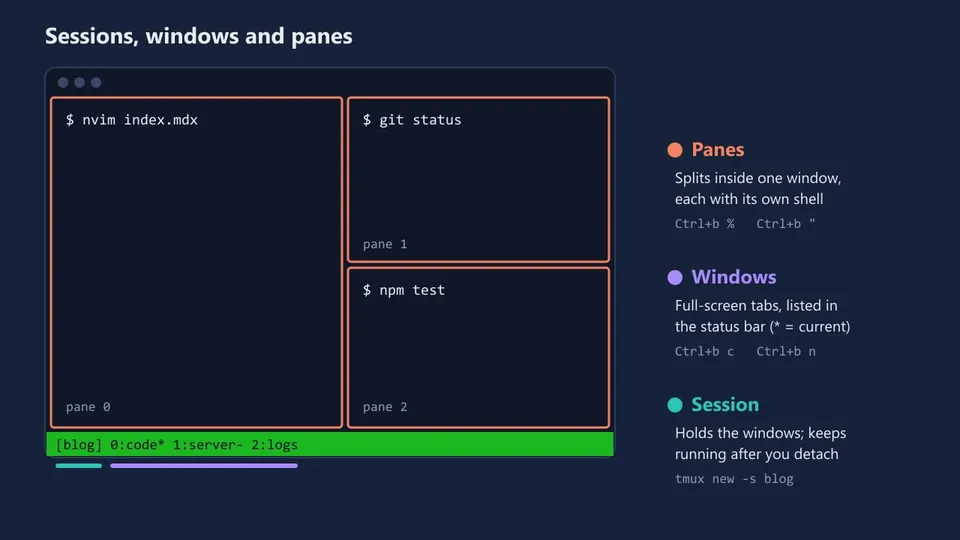
tmux has three levels, and the commands make sense once you know which level each one acts on:
- A session is a set of windows with a name. It belongs to a tmux server running in the background, so it keeps running when you detach.
- A window is like a browser tab: it fills the screen, and the status bar at the bottom lists all of them. The
*marks the current one and the-the previous one. - A pane is a split inside a window. Each pane runs its own shell.
The prefix key
To tell tmux that a key is for it and not for the program in the pane, you press the prefix first. The default is Ctrl+b. So "Ctrl+b c" means: hold Ctrl, press b, release both, then press c. Don't hold Ctrl while you press c: Ctrl+b Ctrl+c is a different binding (or none).
You can also type any tmux command after Ctrl+b :. For example, Ctrl+b : and then kill-session closes the current session. Every command in this post works both ways: in your shell as tmux <command>, or inside tmux after Ctrl+b :.
tmux session commands
Sessions are what make tmux useful: you start a long task, detach, close the laptop and come back later to the same screen.
Start a new session
tmux new -s blog
new is short for new-session, and -s gives the session a name. Without -s, tmux names them 0, 1, 2... which gets confusing fast. Add -d to create the session in the background without attaching to it.
For a "take me back to my work" command, use -A:
tmux new -A -s main
With -A, new-session behaves like attach-session if the session already exists. It's a good line to put in an alias or in your terminal's startup command.
tmux list sessions
From outside tmux:
tmux ls
api: 1 windows (created Mon Nov 16 16:05:12 2026)
blog: 2 windows (created Mon Nov 16 16:05:12 2026) (attached)
Inside tmux, Ctrl+b s opens an interactive list of sessions (with their windows when you expand them). Move with the arrow keys and press Enter to switch. Ctrl+b ( and Ctrl+b ) jump to the previous and next session without the list.
tmux detach and attach
To leave tmux but keep everything running, detach:
Ctrl+b ddetaches the current client.tmux detachdoes the same from the command line.
Then, from any terminal (including a new SSH connection to the same machine), attach again:
tmux attach -t blog
tmux attach without -t attaches to the most recently used session, and tmux a works too, because tmux accepts any unambiguous abbreviation of a command. If the session is attached in another terminal, tmux attach -d -t blog detaches the other one first, which fixes the screen size when the other terminal is smaller.
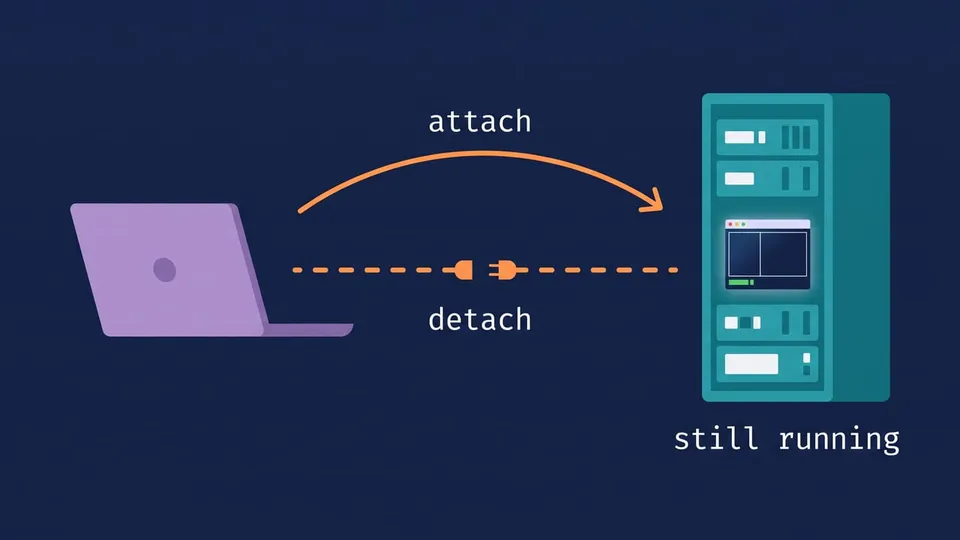
This is the main reason people use tmux on servers: if the SSH connection drops in the middle of a migration or a build, the process doesn't die with it. You reconnect, run tmux attach and see it where it was.
tmux kill session
tmux kill-session -t api     # kill one session
tmux kill-session -a         # kill every session except the current one
tmux kill-server             # kill all sessions and the tmux server
After kill-server, tmux ls prints no server running on /tmp/tmux-1000/default (the number is your user ID). That's normal: the server starts again with the next tmux new.
tmux rename session
Press Ctrl+b $ to rename the current session, or from the shell:
tmux rename-session -t 0 blog
tmux window commands
| Action | Keys | Command |
|---|---|---|
| New window | Ctrl+b c | tmux new-window -n logs |
| Rename window | Ctrl+b , | tmux rename-window logs |
| Next / previous window | Ctrl+b n / Ctrl+b p | tmux next-window |
| Go to window by number | Ctrl+b 0 to 9 | tmux select-window -t 2 |
| Last used window | Ctrl+b l | tmux last-window |
| Pick from a list | Ctrl+b w | tmux choose-tree -w |
| Find a window by text | Ctrl+b f | tmux find-window text |
| Close window (asks first) | Ctrl+b & | tmux kill-window |
Window names show up in the status bar, so naming them (server, logs, db) pays off when you have more than three.
tmux pane shortcuts: split, move, resize, close
| Action | Keys |
|---|---|
| Split left/right | Ctrl+b % |
| Split top/bottom | Ctrl+b " |
| Move to the pane in that direction | Ctrl+b + arrow |
| Next pane / last pane | Ctrl+b o / Ctrl+b ; |
| Show pane numbers (press a number to jump) | Ctrl+b q |
| Zoom / unzoom the current pane | Ctrl+b z |
| Resize by 1 cell / by 5 cells | Ctrl+b Ctrl+arrow / Ctrl+b Alt+arrow |
| Swap with the previous / next pane | Ctrl+b { / Ctrl+b } |
| Cycle through preset layouts | Ctrl+b Space |
| Move the pane to its own window | Ctrl+b ! |
| Close pane (asks first) | Ctrl+b x |
The names of the two split keys are easy to mix up. In tmux terms, % is split-window -h (horizontal: the new pane goes to the right) and " is split-window -v (the new pane goes below). Think of what the dividing line looks like: % draws a vertical line, " a horizontal one.
The resize keys repeat: after Ctrl+b, you can press Ctrl+arrow several times without pressing the prefix again. For an exact size, use a command:
tmux resize-pane -D 10   # 10 lines down
tmux resize-pane -x 80   # exactly 80 columns wide
To close a pane you can also just end its shell with exit or Ctrl+d. When the last pane of the last window closes, the session ends.
Tip: To type the same command in every pane of a window (handy for a few servers at once), run Ctrl+b : and then setw synchronize-panes on. Turn it off the same way with off.
How to scroll up in tmux (copy mode)
Your terminal's scrollbar doesn't work inside tmux, because tmux redraws the screen itself. To scroll back, you enter copy mode:
- Press
Ctrl+b [(orCtrl+b PgUpto enter and scroll one page at once). - Scroll with the arrow keys,
PgUpandPgDn. - Press
qto go back to the prompt.
With the mouse, it depends on your version. In tmux 3.8, mouse support is on by default, so the mouse wheel enters copy mode and scrolls, and you can click a pane to select it and drag its border to resize. In tmux 3.7 and earlier (including the 3.4 in Ubuntu 24.04), the mouse is off. Turn it on with:
tmux set -g mouse on
Put set -g mouse on in ~/.tmux.conf to keep it (more on that file below).
tmux keeps 2,000 lines of history per pane by default (history-limit). Raise it in the config if your build logs are longer.
Copy mode keys: emacs vs vi
Copy mode has two sets of keys. The default is emacs-style, unless your VISUAL or EDITOR environment variable contains vi (so EDITOR=nvim gives you vi keys). Many cheat sheets list / and ? as the search keys, but they only work in vi mode. In the default emacs mode, search is Ctrl+s (down) and Ctrl+r (up).
| Action | emacs mode (default) | vi mode |
|---|---|---|
| Page up / down | PgUp / PgDn | Ctrl+b / Ctrl+f |
| Half page up / down | - | Ctrl+u / Ctrl+d |
| Top / bottom of history | Alt+< / Alt+> | g / G |
| Search down / up | Ctrl+s / Ctrl+r | / / ? |
| Next / previous match | n / N | n / N |
| Start selection | Ctrl+Space | Space |
| Copy selection and exit | Alt+w | Enter |
| Exit copy mode | q or Esc | q |
Check which mode you have with tmux show -gw mode-keys.
tmux copy and paste
Copying inside tmux works in three steps:
- Enter copy mode with
Ctrl+b [and move to the start of the text. - Start the selection (
Ctrl+Spacein emacs mode,Spacein vi mode), move to the end and copy (Alt+worEnter). - Paste in any pane with
Ctrl+b ].
tmux keeps the copied text in its own paste buffers. Ctrl+b = lists them so you can pick an older one. Whether the copy also reaches your system clipboard depends on the terminal: tmux tries to send it with the OSC 52 escape sequence (the set-clipboard option). Windows Terminal and kitty accept it, and iTerm2 does after you allow apps to access the clipboard in its settings.
With the mouse on, you can also select text by dragging: tmux enters copy mode and copies when you release the button. To select text with your terminal's own selection instead (to bypass tmux), hold Shift while you drag in most terminals, or Option in iTerm2.
Note: In vi mode, v and y don't do what Vim users expect by default: v toggles rectangle selection and y isn't bound. The config below fixes that.
A starter tmux.conf
tmux reads its config from ~/.tmux.conf, or from ~/.config/tmux/tmux.conf if you prefer to keep it in .config. Here is a short config with the changes most people make. I loaded it without errors in tmux 3.8 and 3.4:
# Use Ctrl+a as the prefix (like GNU Screen)
unbind C-b
set -g prefix C-a
bind C-a send-prefix

# Mouse support (on by default since tmux 3.8)
set -g mouse on

# Start window and pane numbers at 1, renumber when one closes
set -g base-index 1
setw -g pane-base-index 1
set -g renumber-windows on

# More scrollback
set -g history-limit 50000

# Split panes with | and -, opening in the current directory
bind | split-window -h -c "#{pane_current_path}"
bind - split-window -v -c "#{pane_current_path}"
bind c new-window -c "#{pane_current_path}"

# vi keys in copy mode: v to select, y to copy
setw -g mode-keys vi
bind -T copy-mode-vi v send -X begin-selection
bind -T copy-mode-vi y send -X copy-selection-and-cancel

# Reload the config with prefix + r
bind r source-file ~/.tmux.conf \; display "Config reloaded"

# Lower the delay after Escape (helps Vim/Neovim)
set -sg escape-time 10
A few notes on it:
Ctrl+ais easier to reach thanCtrl+b, but it's also "go to the beginning of the line" in Bash and Zsh.bind C-a send-prefixkeeps it: pressCtrl+atwice to send it to the shell. Skip this block if you use that shortcut a lot.- Windows start at 0 by default, and
0is far from1on the keyboard. That's whatbase-index 1changes. - With
-c "#{pane_current_path}", new panes and windows open in the same folder as the current pane instead of the folder where you started the session. escape-timeis how long tmux waits afterEscto see if it's the start of a key sequence. The default is 10 ms since tmux 3.5, but 3.4 and earlier used 500 ms, which makesEscin Vim feel slow.
Reload tmux config
tmux reads the config only when the server starts. After you edit the file, reload it in the running server:
tmux source-file ~/.tmux.conf
or press Ctrl+b : and type source-file ~/.tmux.conf. With the config above, prefix r does it for you. A reload only applies what's in the file: if you delete a line, the old setting stays until you restart the server with tmux kill-server.
Tip: If you write small helper scripts to start your tmux layout (one window for the editor, one for the server, one for logs), my post on Bash scripting covers the basics. A script with tmux new -d -s app, a few tmux new-window -t app -n server lines and a final tmux attach -t app is enough.
tmux for AI coding agents
tmux is also handy with AI coding agents. An agent like Claude Code can work for a long time on a remote machine, and running it inside a tmux session means it keeps going when you close the laptop: start it with tmux new -s agent, run claude, detach with Ctrl+b d and attach later to check on it.
Claude Code also uses tmux directly: its experimental agent teams can open each teammate in its own pane when you run claude inside tmux with the teammateMode setting on "auto". If you want several agents on the same repository, give each one its own folder with git worktree and its own tmux window, so you can switch between them with Ctrl+b n. For agents that run inside a single session, see my post on Claude Code subagents.
FAQ
What is the tmux prefix key and how do I change it?
The prefix is the key combination you press before every tmux shortcut. The default is Ctrl+b. To change it, add set -g prefix C-a (or another key) and unbind C-b to ~/.tmux.conf and reload the config. Check the current value with tmux show -g prefix.
How do I exit tmux?
It depends on what you want. To leave tmux and keep your programs running, detach with Ctrl+b d. To close everything, type exit in each pane (or press Ctrl+b & to close a window), or run tmux kill-session for the current session. tmux kill-server ends all sessions at once.
tmux vs screen: which one should I use?
Both keep your sessions running after you disconnect and both split the terminal. tmux is the one most tools and guides target today, and it's easier to script and configure: every action is a command you can run from the shell or bind to a key. GNU Screen is still installed on many older servers, so it's worth knowing that its prefix is Ctrl+a. If you're used to it, the config above gives tmux the same prefix.
Why can't I scroll with the mouse in tmux?
Because mouse support is off in tmux 3.7 and earlier. Run tmux set -g mouse on or add set -g mouse on to ~/.tmux.conf. Since tmux 3.8, it's on by default. Without the mouse, scroll with Ctrl+b [ and the arrow keys or PgUp.
Conclusion
You don't need to memorize the 90-plus prefix bindings that tmux 3.8 ships with. Sessions (tmux new -s, Ctrl+b d, tmux attach), a few window and pane keys (c, n, %, ", arrows, z) and copy mode (Ctrl+b [) cover almost everything. Add a short ~/.tmux.conf with mouse support and splits that keep the current folder, and Ctrl+b ? is there when you forget something.
If you're on Windows, start with WSL and Windows Terminal, and use tmux inside it like you would on a Linux server.
Links
- tmux wiki: Getting Started
- tmux wiki: Installing
- tmux manual page
- tmux 3.8 release and CHANGES
- Claude Code: agent teams
- tmux logo © 2015 Jason Long, ISC license